| 일 | 월 | 화 | 수 | 목 | 금 | 토 |
|---|---|---|---|---|---|---|
| 1 | 2 | 3 | 4 | 5 | 6 | 7 |
| 8 | 9 | 10 | 11 | 12 | 13 | 14 |
| 15 | 16 | 17 | 18 | 19 | 20 | 21 |
| 22 | 23 | 24 | 25 | 26 | 27 | 28 |
- 무료 오라클 데이터베이스
- Oracle 테이블 대소문자
- oracle 18c
- Oracle Express Edition
- ORA-12899
- 오라클 캐릭터셋 확인
- 오라클 캐릭터셋 변경
- oracle
- 비전공자를 위한 데이터베이스 입문
- Orace 18c
- Oracle 윈도우 설치
- Oracle 테이블 띄어쓰기
- Oracle 18c HR schema
- Oracle 사용자명 입력
- ora-01722
- Oracle 18c 설치
- Oracle 사용자명
- 서평단
- Oracle 18c HR
- 오라클 캐릭터셋 조회
- 무료 오라클 설치
- 윈도우 Oracle
- Oracle 초기 사용자
- ORA-00922
- Today
- Total
The Nirsa Way
[Elastic] packetbeat + elasticsearch + kibana 7.8 설치/구성 방법 (packetbeat install, elasticsearch install, kibana install) 본문
[Elastic] packetbeat + elasticsearch + kibana 7.8 설치/구성 방법 (packetbeat install, elasticsearch install, kibana install)
KoreaNirsa 2020. 7. 2. 18:09
-
packetbeat + elasticsearch + kibana 설치/구성 방법 (packetbeat install, elasticsearch install, kibana install)
packetbeat는 네트워크 레벨의 패킷 수집이 가능한 오픈소스 툴이며 아래와 같은 구성으로 사용이 가능합니다. 참고로 이 글에서는 모두 네트워크 대역을 0.0.0.0 으로 바인딩 해주었으니 각 환경에 맞게 셋팅 하시길 바랍니다.

우선 elasticsearch 7.8 버전과 kibana 7.8 버전을 설치하기 위해 repo를 추가해주신 후 yum 설치를 진행 합니다. 참고로 elastic repo가 빠를땐 빠른데, 느릴땐 굉장히 느려서 설치만 ELK 설치만 거의 한시간가량 걸릴수도 있습니다.
# kibana repo
cat <<EOF > /etc/yum.repos.d/kibana.repo
[kibana-7.x]
name=Kibana repository for 7.x packages
baseurl=https://artifacts.elastic.co/packages/7.x/yum
gpgcheck=1
gpgkey=https://artifacts.elastic.co/GPG-KEY-elasticsearch
enabled=1
autorefresh=1
type=rpm-md
EOF

# elasticsearch repo
cat <<EOF > /etc/yum.repos.d/elasticsearch.repo
[elasticsearch-7.x]
name=Elasticsearch repository for 7.x packages
baseurl=https://artifacts.elastic.co/packages/7.x/yum
gpgcheck=1
gpgkey=https://artifacts.elastic.co/GPG-KEY-elasticsearch
enabled=1
autorefresh=1
type=rpm-md
EOF
yum -y install elasticsearch kibana
이후 kibana에 접근할 호스트를 설정하기 위해 /etc/kibana/kibana.yml 파일을 열으신 후 아래와 같이 수정 후 서비스를 시작 해주세요.


systemctl start kibana
systemctl enable kibana
다른 노드들에 packetbeat를 설치 후 패킷을 수집할거라면 elasticsearch.yml 파일을 수정 해주어야 합니다. 이 부분은 게시글 가장 하단에 작성할테니 우선 순서대로 따라오셔도 무방 합니다. (이유는 정확히 모르겠는데, 먼저 바꾸면 connection error가 발생 하네요.)
elasticsearch 서비스를 시작 해주세요.
systemctl start elasticsearch
systemctl enable elasticsearch
이제 아래 명령어를 이용해 packetbeat를 설치 한 후 /etc/packetbeat/packetbeat.yml 파일을 열어주세요.
yum -y install libpcap
curl -L -O https://artifacts.elastic.co/downloads/beats/packetbeat/packetbeat-7.8.0-x86_64.rpm
rpm -vi packetbeat-7.8.0-x86_64.rpm
기본적으로 packetbeat.interfaces.device는 any로 되어 있기 때문에 따로 건드릴 필요는 없습니다. 조금 하단을 보면 아래와 같은 필드들이 있는데, 여기서 사용할 프로토콜만 냅두고 나머지는 주석처리하여 비활성화 시켜주세요.
저는 http, tls(443)을 제외한 나머지 프로토콜들을 모두 주석 처리 하였습니다.
packetbeat.protocols:
- type: icmp
  # Enable ICMPv4 and ICMPv6 monitoring. Default: false
  enabled: true

- type: amqp
  # Configure the ports where to listen for AMQP traffic. You can disable
  # the AMQP protocol by commenting out the list of ports.
  ports: [5672]

- type: cassandra
  #Cassandra port for traffic monitoring.
  ports: [9042]

- type: dhcpv4
  # Configure the DHCP for IPv4 ports.
  ports: [67, 68]

- type: dns
  # Configure the ports where to listen for DNS traffic. You can disable
  # the DNS protocol by commenting out the list of ports.
  ports: [53]

- type: http
  # Configure the ports where to listen for HTTP traffic. You can disable
  # the HTTP protocol by commenting out the list of ports.
  ports: [80, 8080, 8000, 5000, 8002]

- type: memcache
  # Configure the ports where to listen for memcache traffic. You can disable
  # the Memcache protocol by commenting out the list of ports.
  ports: [11211]

- type: mysql
  # Configure the ports where to listen for MySQL traffic. You can disable
  # the MySQL protocol by commenting out the list of ports.
  ports: [3306,3307]

- type: pgsql
  # Configure the ports where to listen for Pgsql traffic. You can disable
  # the Pgsql protocol by commenting out the list of ports.
  ports: [5432]

- type: redis
  # Configure the ports where to listen for Redis traffic. You can disable
  # the Redis protocol by commenting out the list of ports.
  ports: [6379]

- type: thrift
  # Configure the ports where to listen for Thrift-RPC traffic. You can disable
  # the Thrift-RPC protocol by commenting out the list of ports.
  ports: [9090]

- type: mongodb
  # Configure the ports where to listen for MongoDB traffic. You can disable
  # the MongoDB protocol by commenting out the list of ports.
  ports: [27017]

- type: nfs
  # Configure the ports where to listen for NFS traffic. You can disable
  # the NFS protocol by commenting out the list of ports.
  ports: [2049]

- type: tls
  # Configure the ports where to listen for TLS traffic. You can disable
  # the TLS protocol by commenting out the list of ports.
  ports:
    - 443   # HTTPS
    - 993   # IMAPS
    - 995   # POP3S
    - 5223  # XMPP over SSL
    - 8443
    - 8883  # Secure MQTT
    - 9243  # Elasticsearch
기본적으로 제공해주는 대쉬보드를 사용할 경우 아래 이미지처럼 setup.dashboards.enabled: true 를 입력 해줍니다. 초기에는 주석처리 및 false로 설정 되어 있습니다.

나머지는 아래 처럼 주석 해제 해주시고, elasticsearch+kibana가 설치된 서버가 아닌 노드라면 localhost 대신 elasticsearch+kibana가 설치된 서버의 IP를 입력 하시면 되고, setup.kibana는 주석처리 하셔도 됩니다.
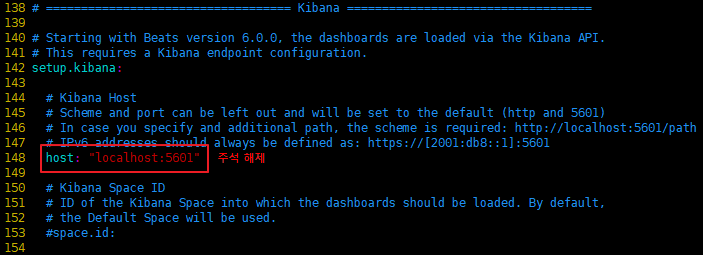

이제 packetbeat 서비스를 실행하면 elasticsearch + kibana + packetbeat 설치 및 설정은 끝난겁니다. 나머지는 kibana 웹 페이지에 접속해 인덱스 설정만 해주면 됩니다.
systemctl start packetbeat
systemctl enable packetbeat
브라우저를 이용해 https://서버IP:5601 으로 접근하여 아래 화면에서 Explore on my own을 클릭하여 샘플 데이터를 받는건 패스 합니다. (샘플 데이터는 나중에 필요하면 다시 얻을 수 있습니다)

좌측 상단의 매뉴 아이콘을 클릭 한 후 가장 하단에 있는 Stack Management를 클릭 합니다.

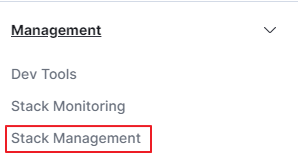
인덱스 패턴 생성을 위해 Index Patterns → Create index pattern 을 클릭 해주세요.


* 아래와 같이 이미 패턴이 생성되어 있다면 인덱스 생성 패스 하셔도 됩니다.

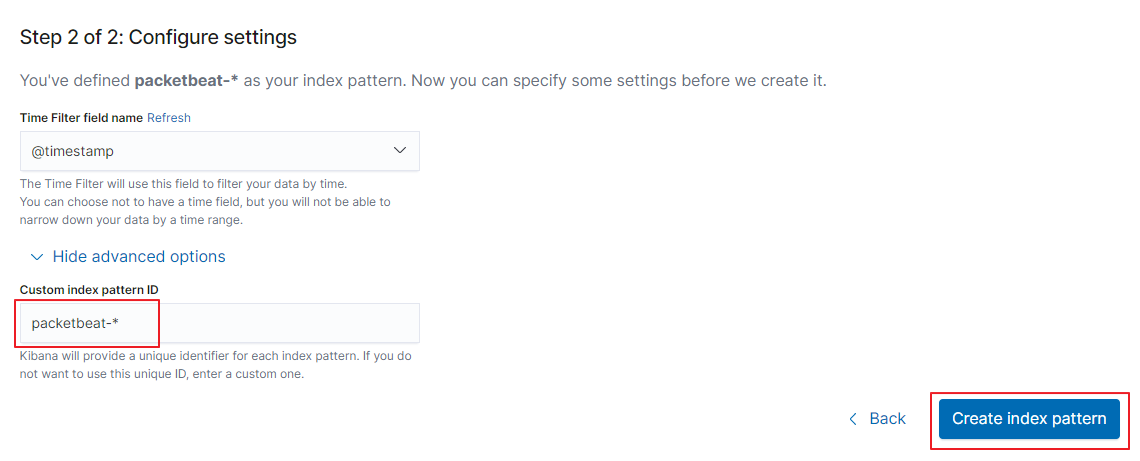
packetbeat-* 입력 후 Next step

@timestamp 선택 후 Show advanced options를 클릭한 후 packetbeat-* 를 입력 합니다. (대쉬보드 인덱스 id를 못불러오는 버그가 발생할 가능성이 높아 작성 해주어야 대쉬보드를 재대로 가져옵니다.)
-
다른 노드에 packetbeat 설치 후 패킷 수집을 할 경우
/etc/elasticsearch/elasticsearch.yml 파일을 열은 후 아래와 같이 수정 합니다. 네트워크 대역은 환경에 맞춰 작성 하시면 되고, 저장한 후 서비스를 재시작 해주셔야 합니다.
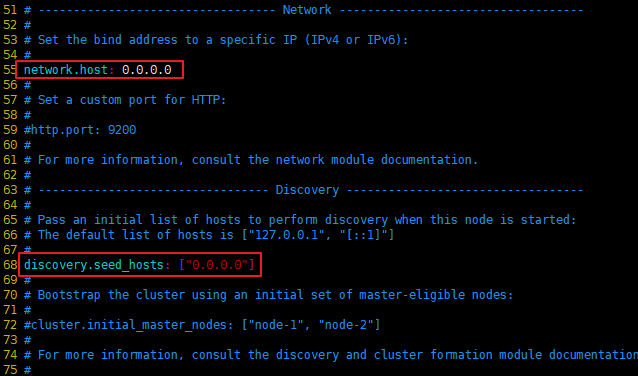
systemctl restart elasticsearch
-
설치 확인
다시 좌측 상단의 매뉴버튼을 누른 후 Discover를 눌러보면 아래와 같이 패킷을 수집 합니다. (저는 http 패킷을 수집중이고, 테스트 서버일 경우 웹 페이지 접속 시도해서 패킷을 보내보셔야 재대로 수집해와서 보입니다.)


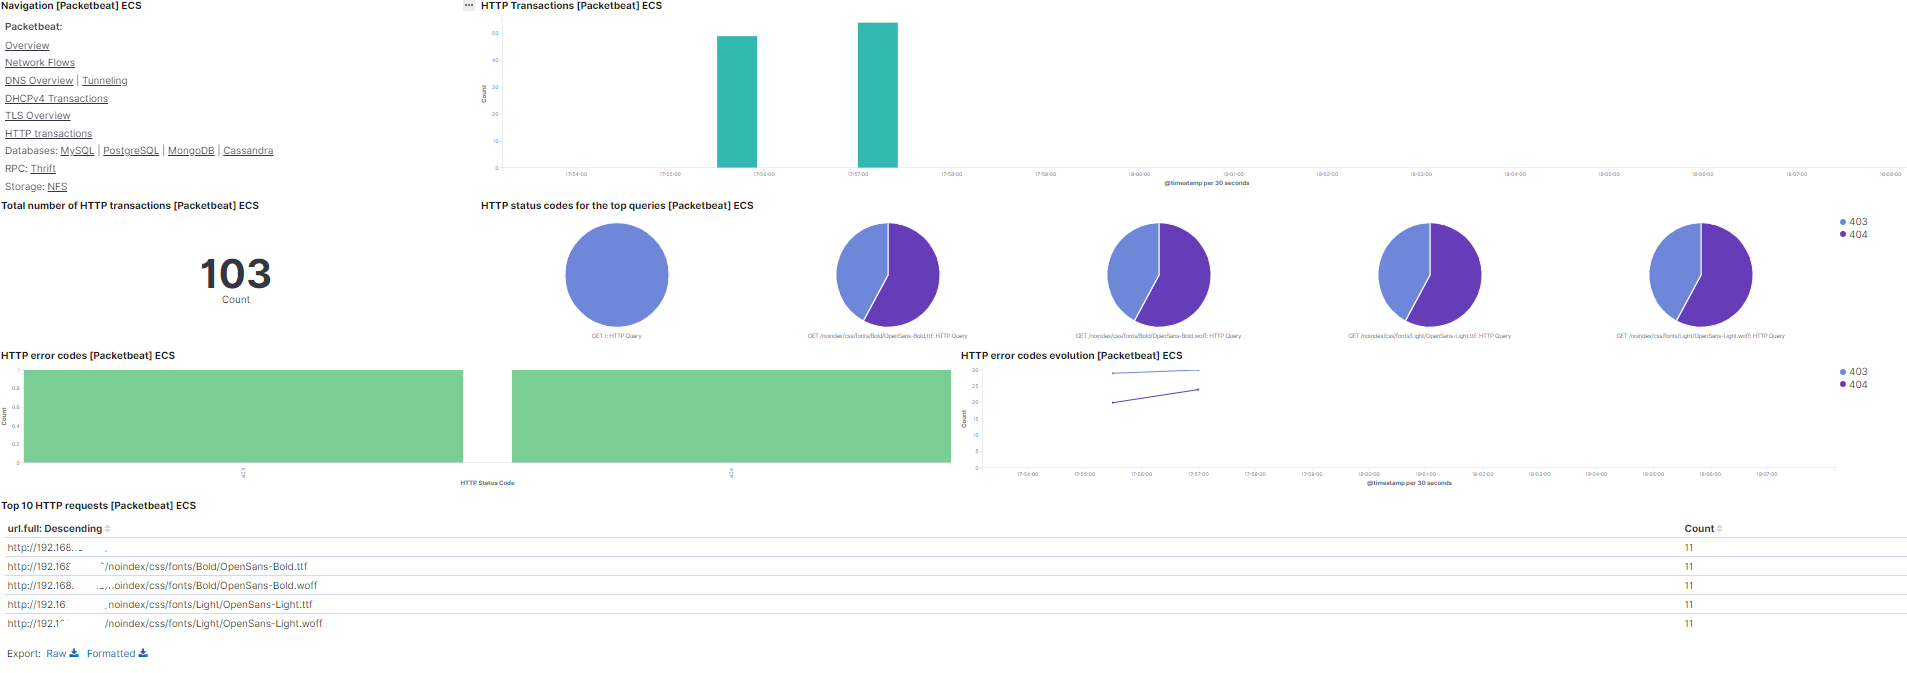
packetbeat.yml 파일을 설정할 때 해놧던 샘플 대쉬보드를 확인해 봅시다. 다시 좌측 상단의 매뉴 버튼을 클릭하고 Dashboard 누른 후 패킷 수집중인것과 맞는 샘플을 누릅니다. (전 HTTP ECS를 보겠습니다.)


아래와 같은 샘플 대쉬보드를 확인을 마지막으로 elasticsearch + kibana + packetbeat 모든 설정, 확인이 끝났습니다.
