| 일 | 월 | 화 | 수 | 목 | 금 | 토 |
|---|---|---|---|---|---|---|
| 1 | 2 | 3 | 4 | 5 | 6 | 7 |
| 8 | 9 | 10 | 11 | 12 | 13 | 14 |
| 15 | 16 | 17 | 18 | 19 | 20 | 21 |
| 22 | 23 | 24 | 25 | 26 | 27 | 28 |
Tags
- Orace 18c
- Oracle 초기 사용자
- oracle
- Oracle 사용자명 입력
- Oracle 18c HR schema
- 오라클 캐릭터셋 확인
- Oracle 테이블 띄어쓰기
- 오라클 캐릭터셋 조회
- Oracle 18c 설치
- 서평단
- ora-01722
- Oracle 사용자명
- ORA-12899
- Oracle Express Edition
- ORA-00922
- Oracle 18c HR
- 비전공자를 위한 데이터베이스 입문
- oracle 18c
- 오라클 캐릭터셋 변경
- Oracle 윈도우 설치
- 무료 오라클 설치
- 무료 오라클 데이터베이스
- 윈도우 Oracle
- Oracle 테이블 대소문자
Archives
- Today
- Total
The Nirsa Way
[Zabbix 5.4] CentOS 8 자빅스 5.4 설치 (zabbix 5.4 install centos8) 본문
Monitoring/Zabbix
[Zabbix 5.4] CentOS 8 자빅스 5.4 설치 (zabbix 5.4 install centos8)
KoreaNirsa 2021. 6. 10. 12:29반응형
CentOS 8 자빅스 5.4 설치 (zabbix 5.4 install centos8)
1. Install Zabbix server, frontend, agent
# Install Zabbix repository
rpm -Uvh https://repo.zabbix.com/zabbix/5.4/rhel/8/x86_64/zabbix-release-5.4-1.el8.noarch.rpm
dnf clean all

# Install Zabbix server, frontend, agent
dnf install -y zabbix-server-mysql zabbix-web-mysql zabbix-apache-conf zabbix-sql-scripts zabbix-agent
2. Install MySQL 8.0 & Create initial database
# Install MySQL 8.0
dnf install -y mysql mysql-server
systemctl start mysqld && systemctl enable mysqld
mysql -u root -p
[Enter]
mysql> alter user 'root'@'localhost' identified by '사용할 비밀번호';
mysql> commit;

# Create initial database
mysql> create database zabbix character set utf8 collate utf8_bin;
mysql> create user zabbix@localhost identified by '사용할 비밀번호';
mysql> grant all privileges on zabbix.* to zabbix@localhost;
mysql> quit;

zcat /usr/share/doc/zabbix-sql-scripts/mysql/create.sql.gz | mysql -uzabbix -p zabbix
3. Configure the database for Zabbix server
/etc/zabbix/zabbix_server.conf 경로에서 아래와 같이 DBPassword를 입력 합니다. DBPassword는 위에서 생성한 zabbix 계정의 패스워드 입니다.

# firewall open port
firewall-cmd --permanent --zone=public --add-port=80/tcp
firewall-cmd --permanent --zone=public --add-port=10050-10051/tcp
firewall-cmd --reload

# selinux permissive
setenforce 0

# service start
systemctl restart zabbix-server zabbix-agent httpd php-fpm
systemctl enable zabbix-server zabbix-agent httpd php-fpm
4. zabbix 웹 페이지 셋업
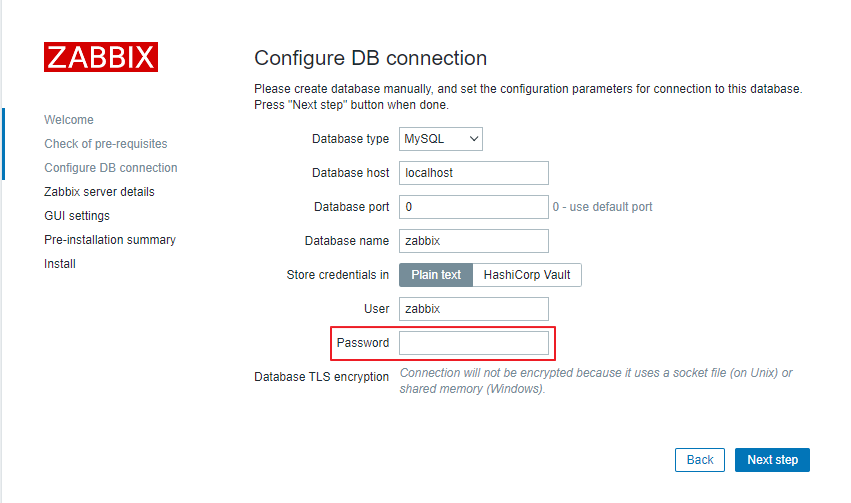
이전 페이지는 Next step 해주시고 아래 화면에서 Password를 입력 합니다. 이 Password는 위에서 설정한 MySQL zabbix 계정의 패스워드를 입력 해주시면 됩니다.

GUI settings 부분에서 time zone을 아래와 같이 Asia/Seoul로 맞춰 주세요. 이후 쭉 넘어가서 Finish 해주시면 됩니다.

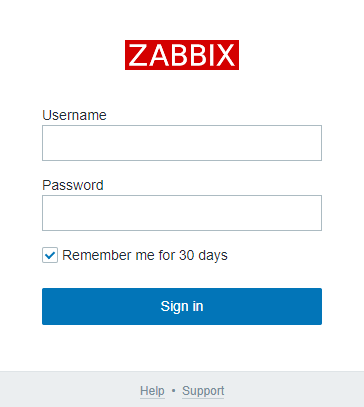
초기 계정은 아래와 같습니다. (아이디 대소문자를 지켜주셔야 합니다)
- ID : Admin
- PW : zabbix


반응형


